Showing posts with label Dreadnought. Show all posts
Wednesday, June 19, 2013
E TENEBRAE LUX 2013: Sternguard
It's that time of the year again when Bolter & Chainsword hosts it's annual painting competition between the various Space Marine Chapter subforums to see which forum can paint the most models by points. The contest is closed to new entrants, but I did sneak in to make this my second time participating in what I think is great way to get people motivated to paint their models.
Thursday, August 9, 2012
E TENEBRAE LUX: Painting Challenge
Man, does time fly. I've been holed up playing 6th Edition and working on my entry for the E TENEBRAE LUX painting challenge from over on Bolter and Chainsword. It's a cool thing the forum does every once in awhile where the different chapters from the various subforums duke it out and see who can paint the most models.
This is my first time contributing and it figures that the Blood Angels are getting crushed. I still wanted to finish my vow, get my models done, and preserve my honor. I really wish this competition didn't take place during the 6th Edition release window as I would have been able to get a lot more done. I'm contemplating upping the ante and doing a second vow, but there is less than a week left so we'll see what happens.
Below are the completed pictures of what I pledged: 2 Baal Predators, a converted Lascannon and Twin-linked Plasmagun Turret, and a Death Company Dreadnought is 480 points. A pittance I know, but every little bit helps. I'm fairly satisfied with how these turned out. Messed around with weathering powders for the first time and I can see a lot of potential for these in the future.
I also included a pic of my converted Librarian as I've been working on him forever. Reminds me a lot of the Librarian that Ron was working on over on From the Warp. Great minds think alike!
You may have seen some of my blog posts over on the 40K Radio website. I volunteered for the staff writer position so you'll be seeing my posts over there as well. If you don't know what 40K Radio is, it's THE 40K Radio Podcast that caters to all things 40K. You can check it out here.
I have my first 6th Edition Tournament this Sunday so I'll try and take some pics and provide a quick tournament report. Have a lot planned for the blog in the coming weeks so stay tuned!
Till next time,
–The Harrower
Tuesday, July 5, 2011
Dreadnought Conversion (1,000 Points • 19 Days Left)
So I got a bit done over the holiday weekend. I'm just about done with my twin-lnked heavy flamer turret. I just need to get hold of a LEGO® hose and I can call it done.
I finished up the conversion of the Dreadnought close combat arm. I didn't do anything crazy here, I just wanted to have the talons more open so both of the close combat arms didn't look exactly the same. This was really easy conversion and here's a quick tutorial.Materials:
- Furioso Dreadnought close combat arm
- 3/32" Drill Bit
- Drill
Step 1: Take your drill and drill out each of the notches where the blood talons go (see the circled areas below). This will allow the fingers/talons to open up more. You could just cut the back of the blood talons off, but I wanted to keep the extra detail on there. To do this, I used a cheap Black and Decker cordless drill that I have and just cut these these out with the side of the drill bit.
Step 2: When you are done, you should be left with something like the below image. You can cut the notches in deeper or more shallow depending on how open you want the blood talons to be.
Step 3: Once you are done glue the blood talons in place and your close combat arm should look similar to mine below depending on how deep you cut the notches.
Here are a couple finished pictures. Like I said, this isn't as extensive as some of my other conversions, but I was going for something simple here and I am happy with the way this turned out.
I also picked up an 18" x 24" picture frame at Walmart that I'm planning on turning into my army display board and I've been painting my Death Company Stormraven. Here is my current progress before the tournament:
Convert: Twin-linked heavy flamer turret, Dreadnought close combat arm- Magnetize: all infantry backpacks, Stormraven
Prime: Assault Marine, Twin-linked heavy flamer turret, Dreadnought close combat arm, Magna-grapple- Paint: 2 Assault Squads, 2 Sanguinary Priests, Librarian, Death Company, Stormraven, Dreadnought, 2 Razorbacks
- Base: all infantry, Stormraven, Dreadnought
- Build: Army Display Board
Figure out how to: Tint the Stormraven canopies red- Detail Pass: Transfers on the infantry and vehicles, freehand symbols on the tanks, weathering and blood stains on the troops and vehicles, etc.
I'll have more updates in a day or two.
Until then,
–The Harrower
Sunday, February 27, 2011
Magnetizing a Dreadnought to a Stormraven Part 2
![]() |
| Image by Terra Luna |
If you have never magnetized a miniature before, read my introductory post Magnetizing 101. If you need a list of materials that I used for this, I would advise you to check out my last post. We are actually going to add 2 materials this week to fill some gaps around the magnet on top of the Dreadnought.
Additional Materials:
- Glazing and Spot Putty aka Bondo (I use 3M and bought mine at Walmart)
- Premium Automotive Sandpaper 320 (Again, 3M bought at Walmart)
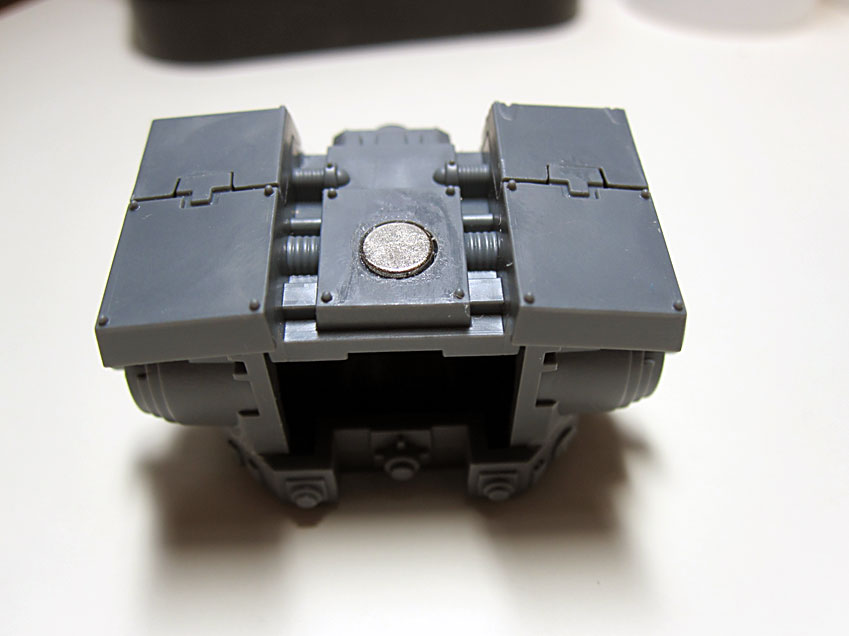
Step 1: Use your 3/16" drill bit and drill a hole in the top of the Dreadnought. You want to try to center this as much as possible. My pin vise isn't big enough to take a 3/16" bit so I was a bit off, but that's okay. This magnet we want to sit flush with the top of the Dreadnought as I want to be able to put the magna-grapple on later. Be careful and don't drill too deep as you don't have a lot of room to work with here. I included a picture which shows the inside on the Dreadnought and we almost drilled clear through. We'll fix that up in the next step.
Note: The reason why I didn't glue the magna-grapple down is because it isn't an option I'll always be using. Plus, there isn't an easy place to put a magnet on the magna-grapple and I don't want to ruin the nicely sculpted Blood Angels icon on top. Also, if I inset the magnet inside of the Dreadnought, it wouldn't be strong enough to hold. In game I can easily take it off for weapon destroyed so that'll work fine.
Step 2: Glue the magnet into the top of the Dreadnought. Also, put a bit of super glue into the indentation on the inside of the Dreadnought to add some strength. To see where I mean, look at the picture in Step 1. You'll want to make sure that the super glue is completely dry before moving on to the next step.
Note: I got this idea from Tommygun over on Warseer. According to him, Bondo is great for filling gaps as it sands easily (unlike epoxy putty) and dries relatively quickly. If you are into scratch building at all, I would check out Tommygun's Backwater Forgeworld post as there is some amazing stuff in there.
Step 4: Use a piece of sandpaper and sand the Bondo smooth. If I could do this step over again, I would have probably used a finer grit sandpaper (like 400 or 800) and actually wet sanded this. Here's a video on YouTube that explains wet sanding. I have some slight grooves on here which are difficult to see and the magnet is protruding slightly, but for a first attempt I'm happy with this.
Step 5: Now that our Dreadnought is all done, we need to put a magnet on the Stormraven. Here I actually used a thicker magnet to compensate for height of the Dreadnought. I used a 3/16" diameter by 1/8" thick. I mentioned in previous posts that I hate when people just glue the magnet right on and make no attempt to hide or camouflage it. Since this piece is upside down and basically not visible, I glued it directly on. Once this is done, glue the entire piece to the bottom of the Stormraven. Once that dries you are pretty much done!
Hindsight: As they always say, hindsight is 20/20. This is a new section I'll be adding to my tutorials which explains what what wrong and what I would change the next time around. I'm pretty happy with how this turned out, but I did make one mistake. When I dry fitted the Dreadnought to the back of my Stormraven, I didn't have the engine with the mufflers on the back. This caused some issues as there isn't enough room for the magnet to sit flush and this causes the Dreadnought to be more swept back.
It's not a huge deal, but it does kinda bug me. Also, despite saying that I was okay with just gluing the magnet directly on the bottom, I'm still not happy with how it looks.
Next time I do this conversion, I'll buy an extra magna-grapple bit from the Furioso Dreadnought Kit over at TheWarStore and use one the magna-grapples to fashion a piece that hangs down enough so that the mufflers don't get in the way.
Here's a couple final pics. I'll take some better shots once I get the models all painted up.
The rest of the guys from our Gaming Club, DED 'ARD, are coming over today to play some 40K. If I don't get too excited playing and I actually remember this time, I'll take some pictures and post them in my next update.
Also, I just primed my entire army and I'm finally getting ready to paint everything up. I'll have some tutorials on painting red and black in the next few weeks.
Till next time, "For the glory of the Emperor and Sanguinius!"
-The Harrower
Saturday, February 19, 2011
Magnetizing a Dreadnought to a Stormraven Part 1
Last time I did an introductory article on how to magnetize your models aptly called Magnetizing 101. If you don't have any experience with this sort of thing or if you need to know where to buy the materials I'm using, I'd advise you to read that post first.
Today, we're going to start working on magnetizing a Dreadnought so that he can be properly transported into battle on the back of a Stormraven. To the right is what the final product looks like. Sorry for the poor pics with the glare, I'll do higher res proper photos once this is all done.
To do this conversion, you'll need the below materials.
Materials:
Today, we're going to start working on magnetizing a Dreadnought so that he can be properly transported into battle on the back of a Stormraven. To the right is what the final product looks like. Sorry for the poor pics with the glare, I'll do higher res proper photos once this is all done.
To do this conversion, you'll need the below materials.Materials:
- Stormraven
- Dreadnought
- Pin Vise
- 1/8" Drill Bit
- 3/16" Drill Bit
- X-Acto Knife
- Super glue (I use Zap-A-Gap)
- 1/8" dia. x 1/32" thick magnets
- 3/16" dia. x 1/16" thick magnets
Optional:
- Super glue accelerator (I use Parts Express Insta-Set)
- 60mm Round Base (I'm not a fan of the sculpted Dreadnought bases)
- Epoxy Ribbon (I use ProCreate Putty as I think it's 100 times better than Green Stuff)
- Sharpie marker
Now that I have all of my materials, I just want to double check everything and make sure I have a plan. Even the most careful plans can go awry and I want to make I don't do something where I end up ruining one of my models.
The biggest problem I see with people who are in the 40K hobby is a lack of planning and patience with what they are doing. I don't know how many Stormravens I've seen already with badly painted pilots because the person that put it together couldn't wait or the rear tail or landing gear are glued on backwards. The devil in in the details Battle Brothers! Take your time to do a good job and make your Primarch proud! Now that I'm off my soap box, let's get started.
Step 1: I didn't want my Dreadnought hanging from the back of the Stormraven attached to a base as I think that'll look stupid and defeat the whole purpose of this conversion. So we are going to magnetize him to a base. First thing you want to do is drill a hole in the bottom of each of his feet with the 1/8" drill bit. You are not going to be able to make the hole deep enough so that the magnet is flush to the bottom of the foot because of the way they legs connect. Look at the picture of the left foot below and you see I started drilling into the ball joint from the leg. This is okay because we want the magnets to slightly stick out. Once the holes are drilled, clean the edges with your x-acto blade (see below pic on left).
Step 2: Take some super glue and put the magnets in place. For polarity, I make sure everything in my entire army is the same. I always use a black marker and mark the side that is getting glued. You don't need to this, but I would strongly suggest it as I have messed up many times trying to skip this step. If you don't have a marker, just scratch an end of the magnet with your x-acto blade. When you are done, it should look like the bottom pic and the magnets should slightly protrude.
Step 3: In this step we are going to set magnets into the Dreadnought's base. I put the legs right on the base and put the 3/16" dia. x 1/16" thick magnets on the bottom and adjusted everything until I had the legs where I wanted them. I marked the bottom of the base where the magnets were and drilled holes with the 3/16" drill bit right through the base. When doing this step, it's easier to drill straight through the base with a smaller drill bit first and then wide the hole with the bigger bit.
Step 4: Set the magnets in the holes and make sure you have the polarity right. The hole will be snug enough to hold the magnets in place. Push the Dreadnought down to account for the extra space that the magnets are protruding on the feet. Put a generous amount of super glue on the bottom of the magnets. I used super glue accelerator to speed up the drying process which is why the bottom of the base looks the way it does. Remove the Dreadnought and add a bit of super glue to the tops of the magnets.
Step 5: Super glue is probably sturdy enough to keep the magnets in place for a long time, but to be on the safe side I mixed up some epoxy ribbon and placed it over the magnets on the bottom. You'll see I also carved an arrow in the bottom of the base because the depth on the magnets is slightly different for each foot and this way I know which way the model should face.
Next time we'll put a magnet on the head of the Dreadnought and tackle the actual grapple itself so we can get him attached to the Stormraven. We'll also discuss a few pitfalls I encountered along the way despite all my careful planning.
Till then,
–The Harrower
Friday, February 4, 2011
It's Stormraven/Dreadnought Building Time!
Well, I'm home from work and my shipment from Neal at the TheWarStore was sitting on my front porch. There is nothing better than getting a box that says, "Your reinforcements have arrived!"
I was thinking about doing my first video as an unboxing, but I honestly just don't have the patience for it and I want to get these bad boys put together.
My first impressions are really good. The detailing on both of these kits is amazing. I felt like the red headed step child for a long time for playing the Blood Angels, but I'm glad I stuck it out as we have arguably some of the best kits in all of 40K starting with Space Hulk and now with the Stormraven and the Furioso Dreadnought.
The thing that I'm most impressed/surprised with is the size comparison between the Stormraven and the Furioso Dreadnought. The Stormraven is simply massive. Here's a few pics I took showing the size difference.
I'm not sure what kit I'm going to build first, but I'm going to get started right away. I'll post a bit more throughout the weekend and probably do a couple tutorials on magnetizing these bad boys.
Till then,
–The Harrower
I was thinking about doing my first video as an unboxing, but I honestly just don't have the patience for it and I want to get these bad boys put together.
My first impressions are really good. The detailing on both of these kits is amazing. I felt like the red headed step child for a long time for playing the Blood Angels, but I'm glad I stuck it out as we have arguably some of the best kits in all of 40K starting with Space Hulk and now with the Stormraven and the Furioso Dreadnought.
The thing that I'm most impressed/surprised with is the size comparison between the Stormraven and the Furioso Dreadnought. The Stormraven is simply massive. Here's a few pics I took showing the size difference.
I'm not sure what kit I'm going to build first, but I'm going to get started right away. I'll post a bit more throughout the weekend and probably do a couple tutorials on magnetizing these bad boys.
Till then,
–The Harrower
Tuesday, January 18, 2011
Blood Angels Dreadnought pics!
Just a quick update. These were posted by Ancient God over on WarSeer.
I think this kit looks awesome. magna-grapple is a little weird, but I'll get used to it. Thoughts?
Till next time,
–The Harrower
I think this kit looks awesome. magna-grapple is a little weird, but I'll get used to it. Thoughts?
Till next time,
–The Harrower
Wednesday, January 12, 2011
New Blood Angels Dreadnought Pics!
These pics have been circling around the 'net today. I have to say these look really awesome and I couldn't be more pleased. I'm definitely going to pick up a couple of these when they are released and dump the Venerable Chaplain Dreadnought I got from Forge World since I haven't put it together yet.
I really like how you get 3 different Dreadnought sarcophaguses on the same sprue as well as enough bitz to create 2 sets of close combat arms (1 with blood fists and 1 with blood talons). I just wish they would put this up for preorder already.
I've been working on a tutorial showing how I have been converting a twin-linked heavy flamer for my Death Company Razorback as my next Liber Sanguinis article. I'll post that in the next day or two.
Until then,
–The Harrower
Subscribe to:
Posts (Atom)