Showing posts with label Painting. Show all posts
Friday, August 16, 2013
Quick Tips: Paint Brush Covers
Welcome to another installment of Quick Tips. I've finally settled on my favorite paint brush, the Blick Master Kolinsky Sable Short Handle Round, and I recently went to Dick Blick to buy a couple more. I was surprised that almost none of their brushes had the clear plastic tube on top to protect the bristles.
When I asked the lady that worked there, she said they always throw them out because no one wanted them and they were only needed for shipping. I was baffled. I carry my brushes around in a pencil box and I need to have the bristles protected. Not only that, I figure if I'm paying more than $15 a brush I should be the one to decide if I want the cover or not. I figured I would just pick up the covers online and promptly bought my brushes and left.
Sunday, July 28, 2013
Quick Tips: Keeping a Painter's Journal
Welcome to another installment of Quick Tips. When working on painting a unit or army for 40K, one of the most important things to keep in mind that a lot of people forget, is to keep a consistent color scheme throughout your entire army. There is nothing worse than adding a new unit or vehicle to your army and having the base color not match. This generally ceates a rather garish affect and makes the new unit or vehicle seem out of place.
Thursday, July 11, 2013
Quick Tips: Making a Paint Palette
This is a new series I'll be running on my blog that I'm calling Quick Tips. If you've read any of my previous tutorials they are usually pretty long and involved and often span multiple posts. Quick Tips are mini tutorials or short pieces of advice for the wargaming hobby.
Today I'm going to talk about paint palettes and how to make your own that isn't only easy to clean, but will last you a long time and cost you only $5.
Tuesday, July 9, 2013
The Cardinal Rule of Painting
I had a rare opportunity last week and was fortunate to have the week off of school. One would think I would be working on my E Tenebrae Lux 2013 vow, but I was drawn in another direction. I did a conversion of Mephiston back in October that I posted over on Bolter and Chainsword in my WIP thread. I thought the conversion was different enough from what everyone was doing with the Astaroth body and I was really happy with it.Next, I had to paint him. Awesome, right? Wrong! I rushed through it to get him ready for a tournament and while I thought he was good at the time I never really finished him. A few days later (which is the litmus test for any artwork I do) I took him out and absolutely hated the paint job. Back in my Battle Foam bag he went where he sat untouched and unloved since last year.
Fast forward to the Kill Team Tournament I was in last month where I was being berated by one of my friends for never having any of my miniatures done. I paint fairly well, but my big problem is I always jump from project to project and I rarely finish painting anything. Not sure why, it's just what I've always done. Of course my plans for getting best painted at the Kill Team Tournament were foiled because I only got one model done (well, it wasn't really done...) so I wanted to finish something and claim with a mighty voice: "This model is done!"
Wednesday, June 26, 2013
Sternguard Update, How I Paint Red, Kill Team Report
Well, I didn't get all my Sternguard finished, but I did a pretty good job on my Sergeant, Brother Tyrael. Yes, I named all my models and I'm a dork. I also had a chance to touch up my mini display board. I need to push the highlights on this miniature a bit more and add some lighter colors to make it pop, but as is, I'm pretty satisfied. This is my most recent formula for red:
- Prime with Army Painter Dragon Red
- Paint over with a really watered down Mephiston Red. The main point of this is to get all the spots that the primer missed.
- Wash with Carroburg Crimson.
- Paint with Mephiston Red. Focus on most of the mini leaving Carroburg Crimson in the deep recesses (panel lines, between the different armor plates, between the joints, etc.).
- Paint the raised areas with Evil Sunz Scarlet.
- Paint over with Bloodletter Glaze to bring the colors closer together. This is as far as I got unfortunately.
- When I continue, I plan on painting the raised areas with Wild Rider Red.
- Finally, I'll paint a very tiny highlight with Bestigor Flesh. If necessary, I'll go over the miniature again with the Bloodletter Glaze.
Thursday, August 9, 2012
E TENEBRAE LUX: Painting Challenge
Man, does time fly. I've been holed up playing 6th Edition and working on my entry for the E TENEBRAE LUX painting challenge from over on Bolter and Chainsword. It's a cool thing the forum does every once in awhile where the different chapters from the various subforums duke it out and see who can paint the most models.
This is my first time contributing and it figures that the Blood Angels are getting crushed. I still wanted to finish my vow, get my models done, and preserve my honor. I really wish this competition didn't take place during the 6th Edition release window as I would have been able to get a lot more done. I'm contemplating upping the ante and doing a second vow, but there is less than a week left so we'll see what happens.
Below are the completed pictures of what I pledged: 2 Baal Predators, a converted Lascannon and Twin-linked Plasmagun Turret, and a Death Company Dreadnought is 480 points. A pittance I know, but every little bit helps. I'm fairly satisfied with how these turned out. Messed around with weathering powders for the first time and I can see a lot of potential for these in the future.
I also included a pic of my converted Librarian as I've been working on him forever. Reminds me a lot of the Librarian that Ron was working on over on From the Warp. Great minds think alike!
You may have seen some of my blog posts over on the 40K Radio website. I volunteered for the staff writer position so you'll be seeing my posts over there as well. If you don't know what 40K Radio is, it's THE 40K Radio Podcast that caters to all things 40K. You can check it out here.
I have my first 6th Edition Tournament this Sunday so I'll try and take some pics and provide a quick tournament report. Have a lot planned for the blog in the coming weeks so stay tuned!
Till next time,
–The Harrower
Sunday, October 9, 2011
Blood Angels Painted Models & Avoiding Burnout
I've been all over the place with my hobby the last few weeks. For starters, I have been doing a rebalance on Mordheim called Newheim, painting and assembling my Blood Angels, and planning our first 40K Battle Report featuring something really cool that I don't think anyone in the 40K blogosphere has done before.
There was a great post by Miniature Tim on how to avoid hobby burnout. If I can give any advice, have multiple projects going on at once. When you get bored of one, switch to something else. Also, try to avoid too much hobby crunch time leading up to a tournament or an event. While those deadlines are good to get some serious work done, a lot of times you finish that last model and walk away from the hobby for a few months. Just look at my run up to the Doubles Tournament at Adventure Games. No posts for almost 2 months after and I didn't get close to getting done what I wanted to.
The painting bug has struck me recently and I have been working a lot on my Blood Angels. It all started at our recent Club Day with getting busted on how all my Land Speeders had no pilots so they couldn't move or shoot. I started assembling and magnetizing a new Land Speeder and I couldn't fully assemble it without painting some of the details. So I've been working on that, my converted Librarian, and my Death Company Rhino/Razorback. Here's some pics.
There was a great post by Miniature Tim on how to avoid hobby burnout. If I can give any advice, have multiple projects going on at once. When you get bored of one, switch to something else. Also, try to avoid too much hobby crunch time leading up to a tournament or an event. While those deadlines are good to get some serious work done, a lot of times you finish that last model and walk away from the hobby for a few months. Just look at my run up to the Doubles Tournament at Adventure Games. No posts for almost 2 months after and I didn't get close to getting done what I wanted to.
The painting bug has struck me recently and I have been working a lot on my Blood Angels. It all started at our recent Club Day with getting busted on how all my Land Speeders had no pilots so they couldn't move or shoot. I started assembling and magnetizing a new Land Speeder and I couldn't fully assemble it without painting some of the details. So I've been working on that, my converted Librarian, and my Death Company Rhino/Razorback. Here's some pics.
I'm happy with how the Land Speeder is coming together. All of the magnets are in except for the gunner. Don't fret, I'll have a tutorial on how to magnetize a Land Speeder in the future. My recent snag is trying to get transfers on the shoulder pads of the gunner and the pilot. My first experience with Micro Sol and Micro Set didn't end very well. Hopefully my next go will yield decent results.
This is my Death Company Rhino/Razorback. I picked up an airbrush recently and the dust on the bottom half of the tank was done by spraying vermin brown. It still needs more weathering/battle damage and I'm not sold on the dust effect. The back door is a conversion I did. I figure the only way the Death Company would get back in the vehicle after the battle would be at the behest of Sanguinius himself. I'm not happy with the realistic painting of this. I'm going to redo it in aged bronze like I painted the Honoured Imperium. Tutorial and pics here.
I got tired of being schooled by all the Psykers in Farseer Frank's Eldar army and one of my other friends recently joined the hobby and started playing Grey Knights. I figured I needed to do my own Librarian and aside from hating metal miniatures, none of the Librarians available appealed to me. This one is made from a variety of bitz. You'll see Death Company, Sanguinary Guard, Grey Knights, and Dark Angels parts on there. I'm thinking of changing the Warding Staff for the Flaming Sword from the Empire Wizards kit. Do you like it as is or should I change it up?
Not sure what I'll be posting next time as I just bought a bunch of tea lights to make some destroyed vehicle markers and I've been doing a bit more work on Mordheim. Who knows what the future holds?
Till then,
–The Harrower
Friday, July 8, 2011
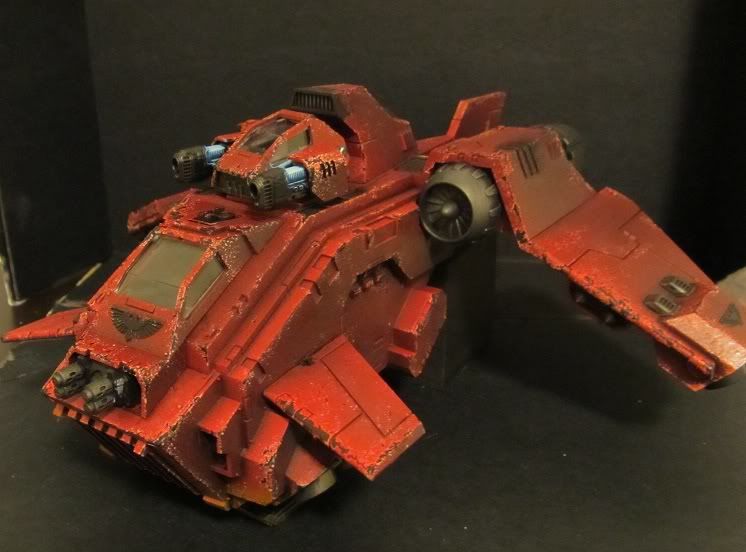
Stormraven Painting (1,000 points • 17 Days Left)
Got a bit of work done on my Death Company Stormraven. I'm starting to think that I bit off a bit more than I could chew. I could spend the next two weeks working on my Stormraven and never touch anything else and still not be completely satisfied. Such is the problem with being an artist... Thankfully my wife will be lending a hand with my troops.
I'm really not a huge fan of painting black, but I think I found a method I'm pretty happy with. I've been doing the panel lines in Codex Gray. Once I'm done, I'll go back over them and do some additional highlights in Fortress Gray. Lastly, I'll do a final wash of Badab Black to even everything out. In these pics the lines are a real mess, but I am getting there.
I did get the side doors magnetized and I'll have a tutorial on that in the future. I also got a new tail piece and added the additional stabilizer wings in the front. I really think this makes the Stormraven look totally bad ass, but I can't take the credit for this. I saw this on another blog, The Brush and Bolter. Ultraraider is an amazing painter, just take a look at this awesome Stormraven. I'd recommend following his blog as he is definitely a painter to watch.
If you have been following my blog, you'll remember that I wasn't too happy with the way I magnetized the Dreadnought to the back of the Stormraven. With the new tail piece I ordered, I got a new grapple so I'll be revisiting that and updating my previous tutorial. I have a ton of work to do, but I'm on a hobby high right now. I just hope I can pull all of this off. Time will tell.
I did find a tutorial on tinting clear plastic canopies with Future Floor Finish and food coloring. So my question to everyone is should I tint my canopies red or green?
Till next time,
–The Harrower
I'm really not a huge fan of painting black, but I think I found a method I'm pretty happy with. I've been doing the panel lines in Codex Gray. Once I'm done, I'll go back over them and do some additional highlights in Fortress Gray. Lastly, I'll do a final wash of Badab Black to even everything out. In these pics the lines are a real mess, but I am getting there.
I did get the side doors magnetized and I'll have a tutorial on that in the future. I also got a new tail piece and added the additional stabilizer wings in the front. I really think this makes the Stormraven look totally bad ass, but I can't take the credit for this. I saw this on another blog, The Brush and Bolter. Ultraraider is an amazing painter, just take a look at this awesome Stormraven. I'd recommend following his blog as he is definitely a painter to watch.
If you have been following my blog, you'll remember that I wasn't too happy with the way I magnetized the Dreadnought to the back of the Stormraven. With the new tail piece I ordered, I got a new grapple so I'll be revisiting that and updating my previous tutorial. I have a ton of work to do, but I'm on a hobby high right now. I just hope I can pull all of this off. Time will tell.
I did find a tutorial on tinting clear plastic canopies with Future Floor Finish and food coloring. So my question to everyone is should I tint my canopies red or green?
Till next time,
–The Harrower
Thursday, December 23, 2010
How To: Painting Tarnished Metal
If you're a regular reader, you may have noticed that I've given the blog a bit of a face lift. That old template just wasn't wide enough and I finally got a chance to mess around with the template designer. Being a graphic designer and someone who is used to working on websites, I have to say the new template designer is really slick. Hats off to Blogger as they did a great job. If you run your own blog here on Blogspot, give it a try as there is a lot of cool stuff you can do and it's really easy to use.
For this post, I wanted to do something different and actually work on the hobby side of things. I consider myself a very well rounded gamer. I like painting and converting just as much as I like playing the game or building scenery. I've been enjoying working on the Liber Sanguinis articles, but I wanted to branch out a bit and either do some painting or build some terrain.
A friend of mine from the DED 'ARD Gaming Club brought over one of the Space Marine statues from the Honoured Imperium set. It was unpainted and I bugged him to leave it at my house so I could paint it because I always wanted to give tarnished metal a try. He agreed and it's been sitting on my desk for a couple days. I wanted to paint, but I didn't want to get involved in trying to develop a color recipe and scheme for my entire army, so I decided to paint this statue and do a quick tutorial. Let's get on with it.
Step 1: Prime the model black. Normally I use cheap flat black spray paint I buy at Lowes for like $1 a can on scenery, but I went with the GW spray on this one.
Step 2: Dry brush the entire model with Tin Bitz. Yes, I said Tin Bitz and damn was I excited too. In my 15 years of painting, I don't think I ever opened this color! This statue is pretty big, so I just stuck with the GW Large Dry Brush.
Step 3: Do another dry brush of Dwarf Bronze. Another color I don't think I've ever used. Never been a fan of smelly dwarves...
Step 4: At this point the model actually looks pretty good and if you go with a lighter hand on the Dwarf Bronze dry brush than I did above, you could leave it at that and call it a day. Dan said he wanted a weathered and tarnished look so let's tackle that.
For this, you need a bluish green wash. I'm sure you've seen pictures of weathered statues before. If not, do a Google Image search. I can't stress enough how reference is extremely important no matter what you are trying to paint or build. I used a mix of about 1 part Dark Angels Green to 2 parts Hawk Turquoise. I applied this liberally over the model and was even adding water directly on the statue to water it down more. You want this wash mostly in the deep recesses and don't worry if you over did it like I did below. We'll revisit that again.
Step 5: The wash is a little heavy handed, but I can see leaving it like if you want your statue really worn out. I wanted oxidation in the deepest recesses only, so back to dry brushing we go. We are basically going to redo the steps we did before. Do another dry brush with Tin Bitz. Yay, Tin Bitz!
Step 6: Dry brush again with Dwarf Bronze.
Step 7: To finish off the metal, do a final dry brush of Shining Gold.
Step 8: For the final step, we need to finish the plinth which is just straight forward dry brushing. I painted the whole area black followed by dry brushing Adeptus Battlegrey and then Space Wolves Grey. For the skull, I painted it Bleached Bone followed by a Gryphonne Sepia Wash. Once the wash was dry, I applied some direct highlights with Bleached Bone.
Below are the final pics which you can click for a larger image. With about an hour of painting, you'll come away with a nicely painted scenery piece.
Hope you enjoyed this tutorial.
Till next time,
–The Harrower
Sunday, December 12, 2010
Liber Sanguinis Week I: Planning Core Army Selection
My new weekly series needed a name. I wanted something I could use to tag all of these articles, was easy for people to remember, and was creative and indicative of what the articles are about. Liber Sanguinis fits those criteria even if it isn't very creative. Oh well. It'll serve the purpose I need and I don't think it's as bad as the myriad of blood-themed wargear in the new Codex. Bonus: I did find a cool website with latin translations while I was contemplating the name.
The first thing I want to do is decide on a strong core for my army. I've been gaming regularly with the DED 'ARD Gaming Club and playing 40K almost once every month, so I have a pretty good idea of what works well for me and the type of force I want to go with.
Before I go into what I'll be using, I did want to mention a bit on tactics and strategy. I will touch briefly on those topics in this series of articles, but before I do, this advice comes with the caveat that I am not a master tactician. Even though I have been wargaming for over 10 years, I'm not an über competitive gamer nor am I yet into the tournament scene. I dabble with mathhammer (running statistics on dice rolls to determine the best outcome), but I'm not obsessed with it.
I consider myself a well rounded gamer that likes all aspects of the hobby and my manta isn't: "To crush your enemies, see them driven before you, and to hear the lamentation of their women." If you guys are looking for that sort of thing (and there is nothing wrong with that type of play as long as it doesn't ruin the fun of the game for your opponent), check out Stelek's Blog, Yes The Truth Hurts. I'll gladly discuss/debate my tactical decisions as I go through this series of articles, but I really don't want that to be the focus of these articles as that type of content is better served by other blog authors out there (like Stelek and Jawaballs) who have experience with the tournament scene.
That being said, there are lots of different types of Army Lists out there that you can go with. Below are just a few of the more popular ones:
Until then Enim Sanguinius!
–The Harrower
The first thing I want to do is decide on a strong core for my army. I've been gaming regularly with the DED 'ARD Gaming Club and playing 40K almost once every month, so I have a pretty good idea of what works well for me and the type of force I want to go with.
Before I go into what I'll be using, I did want to mention a bit on tactics and strategy. I will touch briefly on those topics in this series of articles, but before I do, this advice comes with the caveat that I am not a master tactician. Even though I have been wargaming for over 10 years, I'm not an über competitive gamer nor am I yet into the tournament scene. I dabble with mathhammer (running statistics on dice rolls to determine the best outcome), but I'm not obsessed with it.
I consider myself a well rounded gamer that likes all aspects of the hobby and my manta isn't: "To crush your enemies, see them driven before you, and to hear the lamentation of their women." If you guys are looking for that sort of thing (and there is nothing wrong with that type of play as long as it doesn't ruin the fun of the game for your opponent), check out Stelek's Blog, Yes The Truth Hurts. I'll gladly discuss/debate my tactical decisions as I go through this series of articles, but I really don't want that to be the focus of these articles as that type of content is better served by other blog authors out there (like Stelek and Jawaballs) who have experience with the tournament scene.
That being said, there are lots of different types of Army Lists out there that you can go with. Below are just a few of the more popular ones:
- Foot Slogging: consisting mostly of infantry that "foot slog" or walk across the battlefield.
- Mech: consisting of a lot of vehicles where your infantry arrives via transports.
- Drop Pod: a list that relies on deploying the majority of your army via drop pod.
- Jumpers: a list where your troops are all or mostly equipped with jump backs. This type of lists works better for Blood Angels because of the Descent of Angels special rule.
- Close Combat: a list where your troops are primarily geared for assault and close combat (my favorite!).
- Shooty: a list where your units have a lot of firepower. I think these lists go against what it is that the Blood Angels do best; however, Jawaballs has had great success with these types of lists. Check out his blog for more info.
- All Comers: a list designed to be able to take on all different kinds of armies. A lot of times you'll see these called tournament/tourney lists as well.
- Spam: a list where you take a lot of one certain type of unit (ie. a list that uses a lot of Razorbacks is called Razorspam).
- Horde: a list where you try and cram as many units on the table as you can.
- There are tons of others. Elite, Offensive, Defensive, etc. but I think I covered all of the important ones and a lot of these are just characteristics of the main type of lists I categorized above.
Until then Enim Sanguinius!
–The Harrower
Wednesday, July 14, 2010
The Aftermath, Painting Gold
So I did manage to get 1 game in with my 750 point list at The Unknown in Scranton last Monday. I played against Farseer Frank and his Eldar. We ended up playing Seize Ground and deploying as Spearhead. It was a close and really competitive game that came down to the wire.
Tactically, I made some really poor decisions (I didn't initiate a single assault) and I had some horrendous luck (I didn't roll one rend with my 2 Twin-linked Assault Cannons), but I did manage to pull out a draw.
I never realized how much staying power Eldar War Walkers have. Even my Reclusiarch leading my Death Company with a Powerfist couldn't take them out after 3 turns. I ended up losing everything I had with the exception of my Reclusiarch, a Veteran Sergeant, and a Razorback.
Frank could have made a push at the end of the game for the win, but like the typical alien scum he played for the sure draw which kept me from suffering my first loss with the new BA dex. No Guts, No Glory I always say! Next time Frank. Next time...
As to my Blood Angels Army, I've recently been working on getting my 2 Razorbacks closer to finished and I've been working on a new Death Company Rhino to replace my Golden Demon Honorable Mention entry from ages past.
For my Razorbacks, I wanted a way to show which one was toting around my Sanguinary Priest. I used the chalice and blood drop bit from the Baal Predator and I also wanted to try out a new technique for painting gold that I learned about on Bolter and Chainsword (B&C).
This is a really easy method and produces great results. You basically just paint the area that you want to be gold Mithril Silver and apply successive washes of Gryphonne Sepia. I had my doubts about how effective this was going to be, but someone did their Sanguinary Guard like this on B&C, and it looked great. Here's a brief tutorial.
Step 1: I started with a Mithril Silver base for the chalice and a Dheneb Stone base for the scroll.
Step 2: Apply the Gryphonne Sepia wash. I did this straight from the pot without watering it down.

Step 3: Wait until the wash is completely dry. This can take up to 30 minutes or so, but you need to wait of you will ruin the effect. Go and paint something else while you wait or grab a sandwich. Once dry, apply the wash again.

Step 4: Again, allow the wash to completely dry and apply it again. The camera doesn't pick up all of the subtle colors, but this does look a lot deeper in person. You could keep applying the wash until you are satisfied with the results. Just be careful not to go too crazy and fill in all your detail. I find 3 applications is sufficient for me.

Step 5: Clean up all your mistakes. I did the tear drop in Liche Purple and called it a day. Normally, I wouldn't call this done as I need to add lettering on the scroll, add some highlights with Bleached Bone, and do the shading on the gem.
Right now my army consists of two painted Razorback and 3 units that aren't even primed yet. With school taking so much of my hobby time, I'm calling this done for now. I'll revisit and add all of the other details later.
My plan is to paint my army in chunks of 750 points to a really good table top quality. Once I have the 750 done, I'll reward myself and go back to add all of the little details.
If you have been following my blog, you may remember the Twin-linked Assault Cannon conversion I was working on. Without further adieu, here she is all painted up.
Again, this isn't near completed as I need to add army badges, weathering, and additional highlights, but it suites me fine for now. Hope you like it.
Next time we'll take a look at my new Death Company Rhino and I'll have another brief tutorial on strengthening ForgeWorld Rhino doors.
Till then,
–The Harrower
Sunday, March 14, 2010
Welcome!
Welcome to DED 'ARD! I have been meaning to start a project blog for quite some time. Jawaballs recently had a post asking for contributing writers, and when I saw that post I figured I would send him an email and see how that goes.
Also, it made me realize that I really should start my own blog for our gaming group that recently got together. So even if Jawaballs has enough contributing writers, I can still do my own thing here. It's something that I wanted to do, but I haven't had the time until recently.
I've played 40K since 3rd Edition after which I left the hobby and my beloved Blood Angels on the shelf to start a company that produced supplements for Dungeons & Dragons via the d20 System. The company I formed, the Inner Circle, has pretty much been put on hiatus as we stoked that fire as long as we could.
This is a new chapter in my 40K hobby career. Hopefully I can convince some of the other members of my gaming group to post some articles on painting, tactics, and terrain. I'll be posting progress on my second go at my Blood Angels Army and hopefully you'll learn something along the way through the various tutorials I have planned...
Here is what I am currently working on. A Razorback with twin-linked assault cannons and a Rhino.
It's been quite some time since I did any painting, so I figured I'd try and cut my teeth on a hand painted Blood Angels Symbol. I still have some weathering left to do as well as vehicle markings and final highlights. Also, I'm still trying to figure out what to do with the side doors. I'll post some progress shots as they get closer to completion.
I hope you like them!
More soon,
–The Harrower
Subscribe to:
Posts (Atom)