

This tutorial is straight forward and doesn't take a lot of time. You can easily make a dozen of these in an hour or so and they really look cool on the battlefield. Here is what you need to get started:
- LED Tea Lights
- Christmas Snow or Poly-Fil
- Glue Gun
- Aerosol Hair Spray
- Hair Dryer (If you are impatient like I am)
- Spray Paint (I used black and red)
- X-Acto Knife

I have 2 types of materials listed above that you can use to make the smoke. The first (and the one I prefer) is Christmas snow. The kind you want to buy is the snow that you have to pull apart. Resist the urge to buy the cheap stuff at the dollar store. It's a lot thinner and doesn't work as well.
The second material is Poly-Fil. You can buy this at Walmart in the craft section. They use it to make pillows and stuffed animals. The reason I am listing this material is because it is available all year round and does a decent job. If you can, get the Christmas snow. If not, Poly-Fil will do in a pinch (I've seen people use cotton too!). I'll explain the differences in the tutorial below. Let's get started!
Step 1: Use the X-Acto Knife and cut the flame off of the top of the tea light. This makes the "flame" a bit brighter as the light isn't getting dispersed by the soft plastic flame. You want to be careful not to cut too far as you'll cut into the LED and ruin it. Just run the blade around the base of the flame and pop it off.

Step 2: With the glue gun, run a line of glue around the sides of the tea light and glue down your smoke. Don't worry if you use too much glue. More is better in this step as it will help to keep the smoke attached.
Step 3: Once the glue dries, start forming your material so it looks like smoke. You can use the glue gun at this stage to glue the smoke to the top of the tea light around the LED. Also, if you are having trouble and your smoke is too thin, you can use the glue gun to glue pieces together if it isn't cooperating. This is the stage where I prefer the Christmas snow. You can shape it a lot easier as it comes in sheets and is made to be pulled apart. With the Poly-Fil, it breaks apart too easily and takes a bit more time to get it shaped correctly. Again, allow the glue to try before proceeding.


The marker on the left was made with Christmas snow. On the right, I used Poly-Fil.
Step 4: After the glue dries, give it a good shot with the hair spray. Make any final tweaks with the smoke and let it dry. I got tired of waiting at this point and used a hair dryer. You can probably skip this step if you don't have hair spray, but I wanted the flame to be a bit more stiff and with my wife and 2 daughters in the house, we have tons of hair spray. If you are using Poly-Fil, I would definitely use hair spray as this material tends to fall apart.
Step 5: Now that the hair spray has dried we can start painting. I'm still experimenting with coloration, but you want the paint to be thicker at the bottom and lighter as you get to the top. Once the paint dries, you can pull on the smoke again to let more white show through (I wouldn't do this if you used Poly-Fil). I added just a spritz of red for color and I like how it looks. Just keep painting and tweaking until you are satisfied with the look and allow everything to dry.
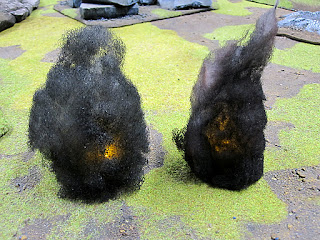

Step 6: Turn on the tea light and marvel at the burning destruction! Above is a picture of 2 different markers I created. The marker on the left was made with Poly-Fil and the marker on the right was made with Christmas snow. You can see why I like the Christmas snow better as you can give the smoke the illusion of blowing in the wind. All in all, it takes maybe 10 minutes to put one of these together.
Updated 11/23/11: Added some videos so you can see the effect better.
Updated 11/23/11: Added some videos so you can see the effect better.

You can get a lot of variation with these markers. Make the smoke bigger or smaller, add more coloration, or use multiple tea lights to create burning terrain that blocks line of sight.
I think it would be cool to use 25mm round bases and make signal grenades with plumes of green or purple colored smoke and use them as objective markers. I always wanted to model a smoke launcher template to cover my tanks and after this I may give that a go in the future. There are also rules for burning buildings in Mordheim so these will work for those as well.
Hope you enjoyed this quick tutorial. I'd love to hear your comments and see the markers you put together. Drop me a line with some photos and tips and I'll feature them in a future blog post.
Till next time,
–The Harrower
Awesome! Great idea!
ReplyDeleteI like them! I recently tried making explosion markers but used a very different process (and less electronics!) However, I think that this will work really well for smoke markers for tanks! Can I ask; how stiff does the hair spray help make this?
ReplyDeleteoh, and is it too much to ask to see some pics of what the christmas snow looks like in the nude? I don't think the spray can stuff I can get in the UK would look quite the same.
Cheers! oink out.
@whitestar333 Thanks! Not really my idea though. :)
ReplyDelete@oink The inside is still pliable. It just helps the smoke keep its shape. I don't have anymore Christmas snow on hand, but I intend to pick some more up. When I do, I'll edit my post.
Thanks for reading guys
here's one we did in 2009, also NOT our idea, we couldn't find who originally came up with this
ReplyDeletehttp://santacruzwarhammer.blogspot.com/2009/09/great-way-to-watch-your-models-burn.html
@oink Added some pics of the Christmas snow and a couple videos. If you have the option, definitely go with the Christmas snow. It's much easier to work with.
ReplyDeleteNice work man! Looks cool..
ReplyDeletethat is too cool, excellent article!
ReplyDelete