Showing posts with label Converting. Show all posts

Friday, April 6, 2012

Resin Casting: 1 Part Molds

I apologize for the brief hiatus. School has been keeping me really busy, but I have been squeezing in hobby time here and there. My latest projects have me working on casting as I have chosen Necrons as my second amy, but I don't want to pay a ton of money for canoptek scarabs.

Ron over at From The Warp did a great tutorial on making scarabs from epoxy ribbon (aka Green Stuff) and I messed around with that, but the cure time takes way too long and I wanted something faster. Eventually I will get into 2 part molds and specifically how to make scarabs, but I want to start on something simpler so I can explain the process. Today I have a tutorial on 1 part molds made from Instant Mold and plastic resin. Here is what you need to get started:
  • Instant Mold (Bought mine from TheWarStore)
  • Smooth-Cast 300 (Bought mine from Smooth-On)
  • Blu-Tack. This is the stuff used to hang posters on the wall. Make sure you buy get actual Blu-Tack. There are a few other brands out there including a white version and one by Elmers. In my experience, they don't work well at all. Get the good stuff.
  • Legos. My kids have tons of these, but you can order whatever pieces you need right from the Lego website.
  • A piece with a flat side to cast. I casted one of the skulls from Games Workshop's Arcane Ruins, but you can do a chapter icon, a Rhino door, or something similar. Just make sure one side is perfectly flat.
  • X-Acto Knife
  • 3 small mixing cups.
  • Sand paper.
Step 1: Build a mold box. I use Legos for this step as they work the best. You want to build a box that is just slightly larger than your part. You also want to build a second piece you can press down on top of your mold. Here is what mine looks like.


Step 2: You need to attach the piece you will be molding to the bottom of your mold box with Blu-Tack like I did below. Make sure the piece sits firmly down and doesn't have any raised edges or the Instant Mold will get under the piece and mess up your mold. I took my walls off to make sure my part was secure.


Step 3: Put the Instant Mold in hot water. I actually boil my water on the stove and cut the Instant Mold down into little pieces. This stuff dries super fast and once it starts to dry, the Instant Mold won't stick to itself so make sure its really hot.


Step 4: Shake off any excess moisture and quickly push the instant mold over the main detail of the part. Fill in all of the gaps and use your press to push down on the mold. Like I mentioned previously, this stuff dries really fast. If you mess it up, don't worry. Instant Mold is reusable and you can heat it up and try again. When you push down on your part, your press piece may stick. This is fine and don't mess with it. Put the mold in the freezer for about 15 minutes and come back to it.


Step 5: You are ready to de-mold your part. Take your mold box apart and remove the molded piece. Carefully pry out your piece with your finger nail or with an x-acto knife.


Step 6: You'll see there is a bit of flashing on the mold from pressing too hard. Just trim the mold with your knife and save the pieces. You can use them later. I heat mine up and roll the unused Instant Mold into a ball. Our mold is done and now we are ready to make our first cast!


Step 7: Working with resin can me messy. It needs to be mixed in equal amounts. I use a cup for each part because pouring from the bottle is way too messy. Nothing will stick to Instant Mold, so you don't need to use mold release or anything like that. Once you have equal amounts of part A and part B, pour them into your mixing cup and mix it well for a minute or two. Make sure to scrape the sides of your container.

Carefully pour the resin into your molds and start the pour on the lowest point of the model. This helps alleviate air bubbles. Don't over fill your molds. You can slightly go over, but you don't want resin pouring out all over as you'll have to sand the pieces flat later on which can be a pain. You'll see I did overfill one of the molds below, but that's the 2 part mold for the scarabs and we'll discuss how that works next time.


Step 8: This is the most agonizing step: waiting till it's done. As the resin cures, it'll get white in the middle and eventually expand out to the edges. This whole process should take about 15 minutes or so and when it starts, it'll happen pretty quickly. You don't want to de-mold the part too soon and ruin it, so be patient!


Step 9: Now that the resin is dry you can remove the part from the mold. You can use either your finger or a hobby knife. Below you can see the molded part and the original. Success! 


Step 10: Take your hobby knife and clean up the flash from around your part. You'll also want to run the back across a piece of sand paper to smooth everything out. If you look closely, you can see some minor imperfections here and there. I'm no master mold maker, but if you ask me this looks a hell of a lot better than Fine Cast.


Below are some of the other pieces I've casted along with the scarabs I have been doing. This method is fairly quick and I can pop out about 3 casts in an hour.


Next time, we'll talk a little bit more about casting and we'll tackle the process I used to create a 2 part mold for the scarabs. Have a Happy Easter!

Until then,
–The Harrower

Tuesday, July 5, 2011

Dreadnought Conversion (1,000 Points • 19 Days Left)

So I got a bit done over the holiday weekend. I'm just about done with my twin-lnked heavy flamer turret. I just need to get hold of a LEGO® hose and I can call it done.

I finished up the conversion of the Dreadnought close combat arm. I didn't do anything crazy here, I just wanted to have the talons more open so both of the close combat arms didn't look exactly the same. This was really easy conversion and here's a quick tutorial.

Materials:

  • Furioso Dreadnought close combat arm
  • 3/32" Drill Bit
  • Drill
Step 1: Take your drill and drill out each of the notches where the blood talons go (see the circled areas below). This will allow the fingers/talons to open up more. You could just cut the back of the blood talons off, but I wanted to keep the extra detail on there. To do this, I used a cheap Black and Decker cordless drill that I have and just cut these these out with the side of the drill bit.  


Step 2: When you are done, you should be left with something like the below image. You can cut the notches in deeper or more shallow depending on how open you want the blood talons to be.


Step 3: Once you are done glue the blood talons in place and your close combat arm should look similar to mine below depending on how deep you cut the notches.


Here are a couple finished pictures. Like I said, this isn't as extensive as some of my other conversions, but I was going for something simple here and I am happy with the way this turned out.


I also picked up an 18" x 24" picture frame at Walmart that I'm planning on turning into my army display board and I've been painting my Death Company Stormraven. Here is my current progress before the tournament:

  • Convert: Twin-linked heavy flamer turret, Dreadnought close combat arm
  • Magnetize: all infantry backpacks, Stormraven
  • Prime: Assault Marine, Twin-linked heavy flamer turret, Dreadnought close combat arm, Magna-grapple
  • Paint: 2 Assault Squads, 2 Sanguinary Priests, Librarian, Death Company, Stormraven, Dreadnought, 2 Razorbacks
  • Base: all infantry, Stormraven, Dreadnought
  • Build: Army Display Board
  • Figure out how to: Tint the Stormraven canopies red
  • Detail Pass: Transfers on the infantry and vehicles, freehand symbols on the tanks, weathering and blood stains on the troops and vehicles, etc.

I'll have more updates in a day or two.

Until then,
–The Harrower

Sunday, February 27, 2011

Magnetizing a Dreadnought to a Stormraven Part 2

Image by Terra Luna
In Part 1 of this series, we added magnets to the feet of our Dreadnought so that he can be removed from his base. This time we are going to add a magnet to the top of the Dreadnought so we can attach him to the Stormraven. We'll also magnetize the Stormraven itself so that the Dreadnought can be brought forth to wreak devastation on the battlefield.

If you have never magnetized a miniature before, read my introductory post Magnetizing 101. If you need a list of materials that I used for this, I would advise you to check out my last post. We are actually going to add 2 materials this week to fill some gaps around the magnet on top of the Dreadnought.

Additional Materials:

  • Glazing and Spot Putty aka Bondo (I use 3M and bought mine at Walmart)
  • Premium Automotive Sandpaper 320 (Again, 3M bought at Walmart)

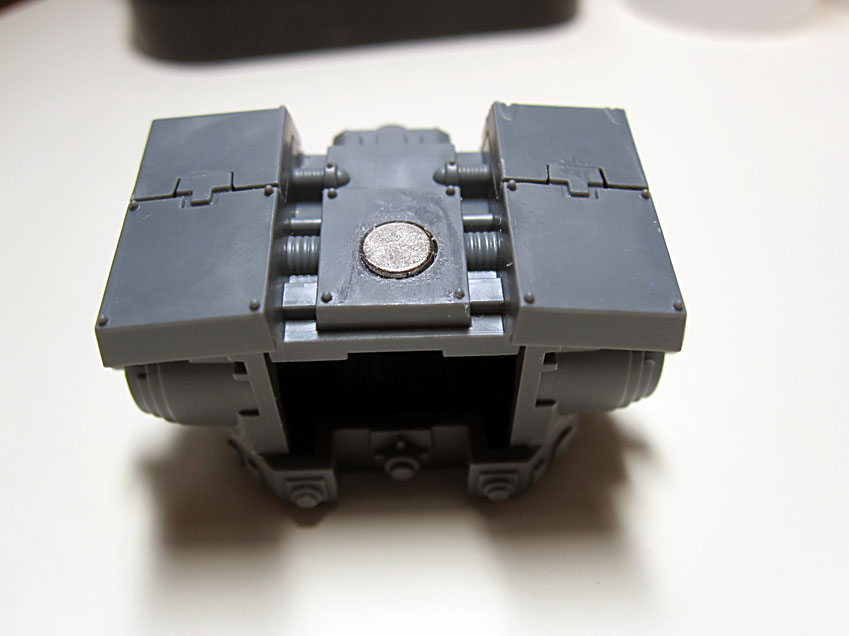
Step 1: Use your 3/16" drill bit and drill a hole in the top of the Dreadnought. You want to try to center this as much as possible. My pin vise isn't big enough to take a 3/16" bit so I was a bit off, but that's okay. This magnet we want to sit flush with the top of the Dreadnought as I want to be able to put the magna-grapple on later. Be careful and don't drill too deep as you don't have a lot of room to work with here. I included a picture which shows the inside on the Dreadnought and we almost drilled clear through. We'll fix that up in the next step.


Note: The reason why I didn't glue the magna-grapple down is because it isn't an option I'll always be using. Plus, there isn't an easy place to put a magnet on the magna-grapple and I don't want to ruin the nicely sculpted Blood Angels icon on top. Also, if I inset the magnet inside of the Dreadnought, it wouldn't be strong enough to hold. In game I can easily take it off for weapon destroyed so that'll work fine.

Step 2: Glue the magnet into the top of the Dreadnought. Also, put a bit of super glue into the indentation on the inside of the Dreadnought to add some strength. To see where I mean, look at the picture in Step 1. You'll want to make sure that the super glue is completely dry before moving on to the next step.


Step 3: Here, we want to make sure the top of the Dreadnought is flat and the magnet is hidden. I sanded smooth the four bolts in each of the corners to make this easier and added a bit of glazing and spot putty. This stuff smells nasty. Makes sure you read all the warnings on the packaging so you don't get brain damage or anything else unsightly. Allow the Bondo to dry fully before moving on. You'll see the color will lighten when it's dry.

Note: I got this idea from Tommygun over on Warseer. According to him, Bondo is great for filling gaps as it sands easily (unlike epoxy putty) and dries relatively quickly. If you are into scratch building at all, I would check out Tommygun's Backwater Forgeworld post as there is some amazing stuff in there.


Step 4: Use a piece of sandpaper and sand the Bondo smooth. If I could do this step over again, I would have probably used a finer grit sandpaper (like 400 or 800) and actually wet sanded this. Here's a video on YouTube that explains wet sanding. I have some slight grooves on here which are difficult to see and the magnet is protruding slightly, but for a first attempt I'm happy with this.


Step 5: Now that our Dreadnought is all done, we need to put a magnet on the Stormraven. Here I actually used a thicker magnet to compensate for height of the Dreadnought. I used a 3/16" diameter by 1/8" thick. I mentioned in previous posts that I hate when people just glue the magnet right on and make no attempt to hide or camouflage it. Since this piece is upside down and basically not visible, I glued it directly on. Once this is done, glue the entire piece to the bottom of the Stormraven. Once that dries you are pretty much done!


Hindsight: As they always say, hindsight is 20/20. This is a new section I'll be adding to my tutorials which explains what what wrong and what I would change the next time around. I'm pretty happy with how this turned out, but I did make one mistake. When I dry fitted the Dreadnought to the back of my Stormraven, I didn't have the engine with the mufflers on the back. This caused some issues as there isn't enough room for the magnet to sit flush and this causes the Dreadnought to be more swept back.


It's not a huge deal, but it does kinda bug me. Also, despite saying that I was okay with just gluing the magnet directly on the bottom, I'm still not happy with how it looks.

Next time I do this conversion, I'll buy an extra magna-grapple bit from the Furioso Dreadnought Kit over at TheWarStore and use one the magna-grapples to fashion a piece that hangs down enough so that the mufflers don't get in the way.

Here's a couple final pics. I'll take some better shots once I get the models all painted up.


The rest of the guys from our Gaming Club, DED 'ARD, are coming over today to play some 40K. If I don't get too excited playing and I actually remember this time, I'll take some pictures and post them in my next update.

Also, I just primed my entire army and I'm finally getting ready to paint everything up. I'll have some tutorials on painting red and black in the next few weeks.

Till next time, "For the glory of the Emperor and Sanguinius!"
-The Harrower 

Saturday, February 19, 2011

Magnetizing a Dreadnought to a Stormraven Part 1

Last time I did an introductory article on how to magnetize your models aptly called Magnetizing 101. If you don't have any experience with this sort of thing or if you need to know where to buy the materials I'm using, I'd advise you to read that post first.

Today, we're going to start working on magnetizing a Dreadnought so that he can be properly transported into battle on the back of a Stormraven. To the right is what the final product looks like. Sorry for the poor pics with the glare, I'll do higher res proper photos once this is all done.

To do this conversion, you'll need the below materials.

Materials:
  • Stormraven
  • Dreadnought
  • Pin Vise
  • 1/8" Drill Bit
  • 3/16" Drill Bit
  • X-Acto Knife
  • Super glue (I use Zap-A-Gap)
  • 1/8" dia. x 1/32" thick magnets
  • 3/16" dia. x 1/16" thick magnets

Optional:
  • Super glue accelerator (I use Parts Express Insta-Set)
  • 60mm Round Base (I'm not a fan of the sculpted Dreadnought bases)
  • Epoxy Ribbon (I use ProCreate Putty as I think it's 100 times better than Green Stuff) 
  • Sharpie marker

Now that I have all of my materials, I just want to double check everything and make sure I have a plan. Even the most careful plans can go awry and I want to make I don't do something where I end up ruining one of my models.

The biggest problem I see with people who are in the 40K hobby is a lack of planning and patience with what they are doing. I don't know how many Stormravens I've seen already with badly painted pilots because the person that put it together couldn't wait or the rear tail or landing gear are glued on backwards. The devil in in the details Battle Brothers! Take your time to do a good job and make your Primarch proud! Now that I'm off my soap box, let's get started.

Step 1: I didn't want my Dreadnought hanging from the back of the Stormraven attached to a base as I think that'll look stupid and defeat the whole purpose of this conversion. So we are going to magnetize him to a base. First thing you want to do is drill a hole in the bottom of each of his feet with the 1/8" drill bit. You are not going to be able to make the hole deep enough so that the magnet is flush to the bottom of the foot because of the way they legs connect. Look at the picture of the left foot below and you see I started drilling into the ball joint from the leg. This is okay because we want the magnets to slightly stick out. Once the holes are drilled, clean the edges with your x-acto blade (see below pic on left).


Step 2: Take some super glue and put the magnets in place. For polarity, I make sure everything in my entire army is the same. I always use a black marker and mark the side that is getting glued. You don't need to this, but I would strongly suggest it as I have messed up many times trying to skip this step. If you don't have a marker, just scratch an end of the magnet with your x-acto blade. When you are done, it should look like the bottom pic and the magnets should slightly protrude.


Step 3:  In this step we are going to set magnets into the Dreadnought's base. I put the legs right on the base and put the 3/16" dia. x 1/16" thick magnets on the bottom and adjusted everything until I had the legs where I wanted them. I marked the bottom of the base where the magnets were and drilled holes with the 3/16" drill bit right through the base. When doing this step, it's easier to drill straight through the base with a smaller drill bit first and then wide the hole with the bigger bit.


Step 4: Set the magnets in the holes and make sure you have the polarity right. The hole will be snug enough to hold the magnets in place. Push the Dreadnought down to account for the extra space that the magnets are protruding on the feet. Put a generous amount of super glue on the bottom of the magnets. I used super glue accelerator to speed up the drying process which is why the bottom of the base looks the way it does. Remove the Dreadnought and add a bit of super glue to the tops of the magnets.


Step 5: Super glue is probably sturdy enough to keep the magnets in place for a long time, but to be on the safe side I mixed up some epoxy ribbon and placed it over the magnets on the bottom. You'll see I also carved an arrow in the bottom of the base because the depth on the magnets is slightly different for each foot and this way I know which way the model should face.


Next time we'll put a magnet on the head of the Dreadnought and tackle the actual grapple itself so we can get him attached to the Stormraven. We'll also discuss a few pitfalls I encountered along the way despite all my careful planning.

Till then,
–The Harrower

Wednesday, February 16, 2011

Magnetizing 101

There's a lot of tutorials out there on how to magnetize different units in 40K from Predators to Veteran Sergeants to Jump Packs, but nothing that really gives you an overview of what you need. I'm going to do a bit of an overview here and let you know what to get and then I'll follow up with a tutorial on magnetizing a Dreadnaught to a Stormraven.

As with all of my tutorials, I'm not going to tell you that my method is the best or anything like that, but this is what works best for me. My advice is to do some research and find what works for you. A lot of people get hung up on the exact tools and materials that someone uses and that's fine, just don't be afraid to experiment.

So what tools do you need to get started on magnetizing your own models? I see a lot of people doing tutorials with Dremels, and I do have one, but I think they are too heavy duty for plastic and that is typically what you'll be magnetizing. A friend of mine has mentioned taking the Dremel apart and adjusting the switch so you can use it at lower than factory settings so it'll work better on plastic, but that sounds like too much of a pain.

I like using a pin vise which is basically just a small drill that you operate by hand. I like this because you have a lot of control over what you are doing and a slip isn't going to destroy your model. You won't be able to get one of these at Lowes or Home Depot. I buy the majority of my hobby tools from Micro-Mark and I'll post links to what I am currently using.

Image taken from Micro-Mark's website

There are a wide variety of pin vises you can buy. I use the heavy duty pin vise (the one on the top) which can take a bit up to 1/4" which is more than you should ever need unless you are trying to magnetize a Titan. The nice thing with this pin vise is that it has a keyless chuck, which basically means you can quickly change out the bits.

You'll also need drill bits. Dremel actually makes a really nice set that you can get at Lowes and they probably have them at Walmart, Sears, or wherever Dremels are sold. Here's a link to the drill bit set I have on Micro-Mark's site.

Image taken from Micro-Mark's website

These bits are the most common sizes and together with the pin vise will only set you back about $20 or so. The only other things you need are super glue, I use Zap-A-Gap, and a Sharpie maker to mark the side of the magnet you are going to glue so you don't mess up your models.

Lastly, we come to the magnets. A lot of people seriously go overboard in this area. Granted you don't want your pieces to fall off mid-game, but I've seen some crazy heavy duty magnets on some models. When I magnetize my models I don't want them in plain sight. Big honking magnets on the side of a vehicle are a pet peeve of mine. If I'm doing a Razorback, I'll either drill a hole and offset the magnet or I'll just glue them to the inside of the hull so you can't see them. The other thing is I don't want the magnet so strong that it's pulling my other models across the table.

I buy all of my magnets at K&J Magnetics, Inc. They are here in Pennsylvania so they ship fast, they have great Customer Service, and their prices are very reasonable. The size I use the most is 1/8" dia. x 1/32" thick. These work really well for Space Marine arms and Backpacks/Jump Packs. If you want to get them at K&J, go with D201-N52 as they are stronger and you can get 100 of them for $9.00.

Image taken from the K&J Magnetics' website

I also use 1/16" dia. x 1/32" thick for magnetizing plasmaguns, meltaguns, and flamers, to the hands of my Assault Squads. You can also use these to swap a hand with a bolt pistol to an infernus pistol or a plasma pistol. These are a little weak for this purpose, but you really can't go any bigger working at these sizes. If you get these from K&J, go with D101-N52.

Image taken from the K&J Magnetics' website

If you are working on something bigger than I typically do, K&J has a Magnet Calculator that'll help you figure out exactly what you need.

Next time I'll show the in progress pics of my Death Company Stormraven and we'll do a tutorial on how to magnetize the turret and attach a Death Company Dreadnaught.

Till then,
–The Harrower