Showing posts with label Storm Raven. Show all posts

Friday, December 5, 2014

Out with the old, in with the new

The new Blood Angels Codex is nearly upon us! With that in mind, I've been taking some time between posts and checking forums to evaluate where I'm at with my blog and how I want to proceed in the coming year. As I look at my posts over the past couple years I notice I have less hobby related posts and a lot more news and rumors.

While I like knowing what's going on with my favorite hobby, Natfka does a much better job of covering the news scene over on Faeit212 than I ever could and it was the models, terrain, and painting that drew me into the Warhammer hobby in the first place. There is nothing that excited me more than looking through old issues of White Dwarf at all of the cool terrain and models. With that in mind, I want to take my blog back in that direction and show off what I'm working on and do more tutorials.

More after the break.

Saturday, November 2, 2013

Blood Angels Digital Codex Errors?

As I mentioned in my previous post, just I picked up the digital edition of Codex: Blood Angels and the rumors (or rumours if you prefer) on vanguard veterans, glaive encarmines, and the Storm Raven were debunked.

Well, I had some time to look at this more and it looks like there is some conflicting information in different sections in the iBook as well as a change to Mephiston that would make him rock even more.

More after the break.

Blood Angels Digital Codex: No Changes

There were rumors going around over on Faeit 212 that the Blood Angels Digital Codex was going to have a few changes. The specific rumored changes were as follows:
  • Vanguard Veterans lose the ability to assault after Deep Strike and Heroic Intervention changed to work like Codex: Space Marines.
  • Stormraven loses the ability to Deep Strike.
  • Glaive Encarmine now provides a +1 bonus to Strength on a turn the model charges. Other stats are Strength as user, AP3, Two-handed, Master-crafted.
More after the break.

Friday, July 8, 2011

Stormraven Painting (1,000 points • 17 Days Left)

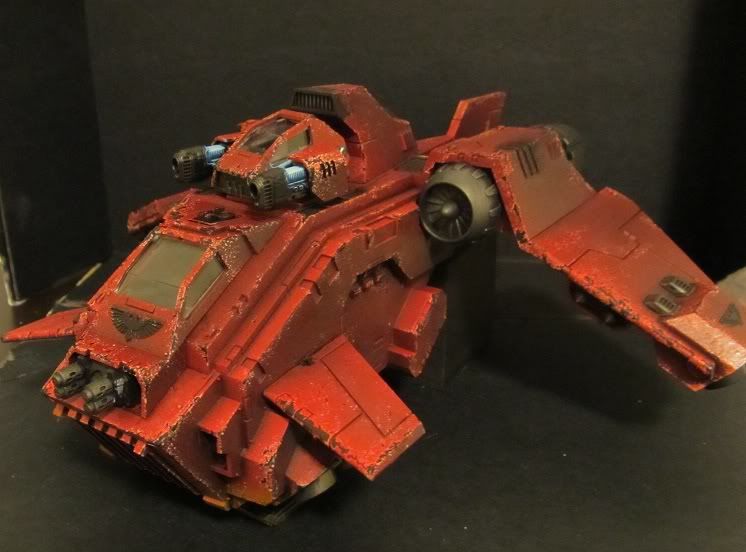
Got a bit of work done on my Death Company Stormraven. I'm starting to think that I bit off a bit more than I could chew. I could spend the next two weeks working on my Stormraven and never touch anything else and still not be completely satisfied. Such is the problem with being an artist... Thankfully my wife will be lending a hand with my troops.

I'm really not a huge fan of painting black, but I think I found a method I'm pretty happy with. I've been doing the panel lines in Codex Gray. Once I'm done, I'll go back over them and do some additional highlights in Fortress Gray. Lastly, I'll do a final wash of Badab Black to even everything out. In these pics the lines are a real mess, but I am getting there.

I did get the side doors magnetized and I'll have a tutorial on that in the future. I also got a new tail piece and added the additional stabilizer wings in the front. I really think this makes the Stormraven look totally bad ass, but I can't take the credit for this. I saw this on another blog, The Brush and Bolter. Ultraraider is an amazing painter, just take a look at this awesome Stormraven. I'd recommend following his blog as he is definitely a painter to watch.


If you have been following my blog, you'll remember that I wasn't too happy with the way I magnetized the Dreadnought to the back of the Stormraven. With the new tail piece I ordered, I got a new grapple so I'll be revisiting that and updating my previous tutorial. I have a ton of work to do, but I'm on a hobby high right now. I just hope I can pull all of this off. Time will tell.

I did find a tutorial on tinting clear plastic canopies with Future Floor Finish and food coloring. So my question to everyone is should I tint my canopies red or green?

Till next time,
–The Harrower

Sunday, February 27, 2011

Magnetizing a Dreadnought to a Stormraven Part 2

Image by Terra Luna
In Part 1 of this series, we added magnets to the feet of our Dreadnought so that he can be removed from his base. This time we are going to add a magnet to the top of the Dreadnought so we can attach him to the Stormraven. We'll also magnetize the Stormraven itself so that the Dreadnought can be brought forth to wreak devastation on the battlefield.

If you have never magnetized a miniature before, read my introductory post Magnetizing 101. If you need a list of materials that I used for this, I would advise you to check out my last post. We are actually going to add 2 materials this week to fill some gaps around the magnet on top of the Dreadnought.

Additional Materials:

  • Glazing and Spot Putty aka Bondo (I use 3M and bought mine at Walmart)
  • Premium Automotive Sandpaper 320 (Again, 3M bought at Walmart)

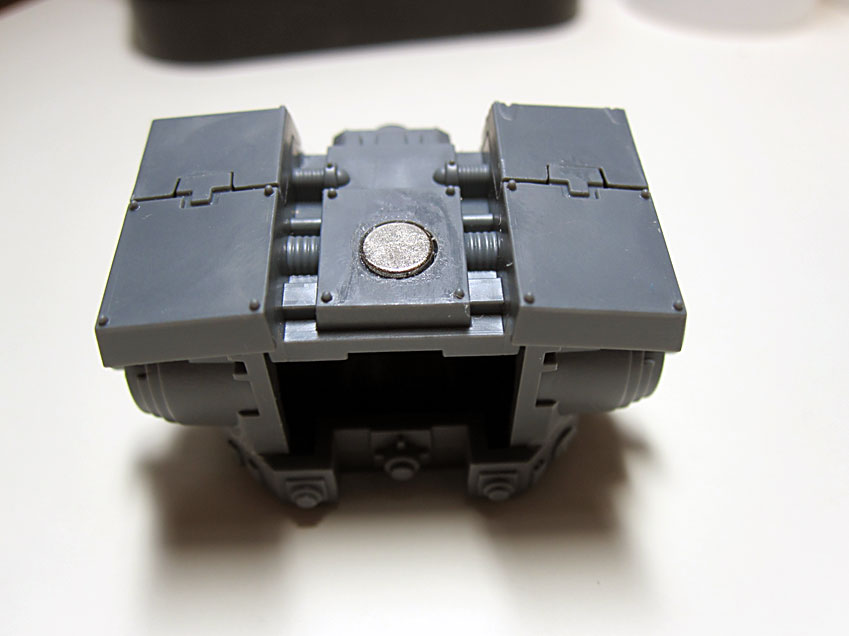
Step 1: Use your 3/16" drill bit and drill a hole in the top of the Dreadnought. You want to try to center this as much as possible. My pin vise isn't big enough to take a 3/16" bit so I was a bit off, but that's okay. This magnet we want to sit flush with the top of the Dreadnought as I want to be able to put the magna-grapple on later. Be careful and don't drill too deep as you don't have a lot of room to work with here. I included a picture which shows the inside on the Dreadnought and we almost drilled clear through. We'll fix that up in the next step.


Note: The reason why I didn't glue the magna-grapple down is because it isn't an option I'll always be using. Plus, there isn't an easy place to put a magnet on the magna-grapple and I don't want to ruin the nicely sculpted Blood Angels icon on top. Also, if I inset the magnet inside of the Dreadnought, it wouldn't be strong enough to hold. In game I can easily take it off for weapon destroyed so that'll work fine.

Step 2: Glue the magnet into the top of the Dreadnought. Also, put a bit of super glue into the indentation on the inside of the Dreadnought to add some strength. To see where I mean, look at the picture in Step 1. You'll want to make sure that the super glue is completely dry before moving on to the next step.


Step 3: Here, we want to make sure the top of the Dreadnought is flat and the magnet is hidden. I sanded smooth the four bolts in each of the corners to make this easier and added a bit of glazing and spot putty. This stuff smells nasty. Makes sure you read all the warnings on the packaging so you don't get brain damage or anything else unsightly. Allow the Bondo to dry fully before moving on. You'll see the color will lighten when it's dry.

Note: I got this idea from Tommygun over on Warseer. According to him, Bondo is great for filling gaps as it sands easily (unlike epoxy putty) and dries relatively quickly. If you are into scratch building at all, I would check out Tommygun's Backwater Forgeworld post as there is some amazing stuff in there.


Step 4: Use a piece of sandpaper and sand the Bondo smooth. If I could do this step over again, I would have probably used a finer grit sandpaper (like 400 or 800) and actually wet sanded this. Here's a video on YouTube that explains wet sanding. I have some slight grooves on here which are difficult to see and the magnet is protruding slightly, but for a first attempt I'm happy with this.


Step 5: Now that our Dreadnought is all done, we need to put a magnet on the Stormraven. Here I actually used a thicker magnet to compensate for height of the Dreadnought. I used a 3/16" diameter by 1/8" thick. I mentioned in previous posts that I hate when people just glue the magnet right on and make no attempt to hide or camouflage it. Since this piece is upside down and basically not visible, I glued it directly on. Once this is done, glue the entire piece to the bottom of the Stormraven. Once that dries you are pretty much done!


Hindsight: As they always say, hindsight is 20/20. This is a new section I'll be adding to my tutorials which explains what what wrong and what I would change the next time around. I'm pretty happy with how this turned out, but I did make one mistake. When I dry fitted the Dreadnought to the back of my Stormraven, I didn't have the engine with the mufflers on the back. This caused some issues as there isn't enough room for the magnet to sit flush and this causes the Dreadnought to be more swept back.


It's not a huge deal, but it does kinda bug me. Also, despite saying that I was okay with just gluing the magnet directly on the bottom, I'm still not happy with how it looks.

Next time I do this conversion, I'll buy an extra magna-grapple bit from the Furioso Dreadnought Kit over at TheWarStore and use one the magna-grapples to fashion a piece that hangs down enough so that the mufflers don't get in the way.

Here's a couple final pics. I'll take some better shots once I get the models all painted up.


The rest of the guys from our Gaming Club, DED 'ARD, are coming over today to play some 40K. If I don't get too excited playing and I actually remember this time, I'll take some pictures and post them in my next update.

Also, I just primed my entire army and I'm finally getting ready to paint everything up. I'll have some tutorials on painting red and black in the next few weeks.

Till next time, "For the glory of the Emperor and Sanguinius!"
-The Harrower 

Saturday, February 19, 2011

Magnetizing a Dreadnought to a Stormraven Part 1

Last time I did an introductory article on how to magnetize your models aptly called Magnetizing 101. If you don't have any experience with this sort of thing or if you need to know where to buy the materials I'm using, I'd advise you to read that post first.

Today, we're going to start working on magnetizing a Dreadnought so that he can be properly transported into battle on the back of a Stormraven. To the right is what the final product looks like. Sorry for the poor pics with the glare, I'll do higher res proper photos once this is all done.

To do this conversion, you'll need the below materials.

Materials:
  • Stormraven
  • Dreadnought
  • Pin Vise
  • 1/8" Drill Bit
  • 3/16" Drill Bit
  • X-Acto Knife
  • Super glue (I use Zap-A-Gap)
  • 1/8" dia. x 1/32" thick magnets
  • 3/16" dia. x 1/16" thick magnets

Optional:
  • Super glue accelerator (I use Parts Express Insta-Set)
  • 60mm Round Base (I'm not a fan of the sculpted Dreadnought bases)
  • Epoxy Ribbon (I use ProCreate Putty as I think it's 100 times better than Green Stuff) 
  • Sharpie marker

Now that I have all of my materials, I just want to double check everything and make sure I have a plan. Even the most careful plans can go awry and I want to make I don't do something where I end up ruining one of my models.

The biggest problem I see with people who are in the 40K hobby is a lack of planning and patience with what they are doing. I don't know how many Stormravens I've seen already with badly painted pilots because the person that put it together couldn't wait or the rear tail or landing gear are glued on backwards. The devil in in the details Battle Brothers! Take your time to do a good job and make your Primarch proud! Now that I'm off my soap box, let's get started.

Step 1: I didn't want my Dreadnought hanging from the back of the Stormraven attached to a base as I think that'll look stupid and defeat the whole purpose of this conversion. So we are going to magnetize him to a base. First thing you want to do is drill a hole in the bottom of each of his feet with the 1/8" drill bit. You are not going to be able to make the hole deep enough so that the magnet is flush to the bottom of the foot because of the way they legs connect. Look at the picture of the left foot below and you see I started drilling into the ball joint from the leg. This is okay because we want the magnets to slightly stick out. Once the holes are drilled, clean the edges with your x-acto blade (see below pic on left).


Step 2: Take some super glue and put the magnets in place. For polarity, I make sure everything in my entire army is the same. I always use a black marker and mark the side that is getting glued. You don't need to this, but I would strongly suggest it as I have messed up many times trying to skip this step. If you don't have a marker, just scratch an end of the magnet with your x-acto blade. When you are done, it should look like the bottom pic and the magnets should slightly protrude.


Step 3:  In this step we are going to set magnets into the Dreadnought's base. I put the legs right on the base and put the 3/16" dia. x 1/16" thick magnets on the bottom and adjusted everything until I had the legs where I wanted them. I marked the bottom of the base where the magnets were and drilled holes with the 3/16" drill bit right through the base. When doing this step, it's easier to drill straight through the base with a smaller drill bit first and then wide the hole with the bigger bit.


Step 4: Set the magnets in the holes and make sure you have the polarity right. The hole will be snug enough to hold the magnets in place. Push the Dreadnought down to account for the extra space that the magnets are protruding on the feet. Put a generous amount of super glue on the bottom of the magnets. I used super glue accelerator to speed up the drying process which is why the bottom of the base looks the way it does. Remove the Dreadnought and add a bit of super glue to the tops of the magnets.


Step 5: Super glue is probably sturdy enough to keep the magnets in place for a long time, but to be on the safe side I mixed up some epoxy ribbon and placed it over the magnets on the bottom. You'll see I also carved an arrow in the bottom of the base because the depth on the magnets is slightly different for each foot and this way I know which way the model should face.


Next time we'll put a magnet on the head of the Dreadnought and tackle the actual grapple itself so we can get him attached to the Stormraven. We'll also discuss a few pitfalls I encountered along the way despite all my careful planning.

Till then,
–The Harrower

Friday, February 4, 2011

It's Stormraven/Dreadnought Building Time!

Well, I'm home from work and my shipment from Neal at the TheWarStore was sitting on my front porch. There is nothing better than getting a box that says, "Your reinforcements have arrived!"

I was thinking about doing my first video as an unboxing, but I honestly just don't have the patience for it and I want to get these bad boys put together.

My first impressions are really good. The detailing on both of these kits is amazing. I felt like the red headed step child for a long time for playing the Blood Angels, but I'm glad I stuck it out as we have arguably some of the best kits in all of 40K starting with Space Hulk and now with the Stormraven and the Furioso Dreadnought.

The thing that I'm most impressed/surprised with is the size comparison between the Stormraven and the Furioso Dreadnought. The Stormraven is simply massive. Here's a few pics I took showing the size difference.


I'm not sure what kit I'm going to build first, but I'm going to get started right away. I'll post a bit more throughout the weekend and probably do a couple tutorials on magnetizing these bad boys.

Till then,
–The Harrower

The Stormraven Cometh!

I got an email from Neal at TheWarStore and my Stormraven shipped yesterday. I just checked the UPS Tracking this morning and it's on route for delivery today!

I'll have 2 Stormravens and a Furioso Dreadnaught to put together and add to my forces. The first Stormraven is going to be black and will be sporting my Death Company and a Death Company Dread.

I'll take a lot of pictures this evening and also do some tutorials on assembly and magnetization. If anyone has any special requests, let me know.

Till then,
–The Harrower

Saturday, January 22, 2011

Stormraven Gunship Build

Was just cruising the 'net this morning and I found this really awesome Blog post by Disdainful from Capture and Control were he does a review and build of the Stormraven.

There are a lot of new pics and it looks like you can swap out a Razorback turret for the canopied turret on the top as well as leave out the intake. I know that will make a lot of people happy.

I can't wait to get hold of mine. My first Stormraven is going to be black with red "X's" everywhere and will be toting around a Death Company Dreadnaught with Blood Talons. It's going to be sweet and I'm sure I'll do my own walk through when I finally get the kit in February.

Still working on my review of the SP200 Photo Studio In a Box. I should have that up later this weekend.

–The Harrower


Tuesday, January 18, 2011

Blood Angels Stormraven Pics!

Another quick update. Ancient God strikes again!


Games Workshop, I take it all back. This model looks amazing. I'll take 3.

The tutorial on the Razorback lascannon and twin-linked plasmagun will be up in the next day or two.

–The Harrower

Sunday, January 16, 2011

New Blood Angels Stormraven Sprue Pics!

These sprue pics turned turned up today on WarSeer and poster Jimbo1701 had actually added the labels. I know I was complaining about the Stormraven earlier and saying that I wasn't happy with it, but I've really warmed up to it since it was leaked back in November.


There are a lot of great bitz on these sprues including some nice Blood Angels icons and even some icons for the upcoming Grey Knights release. I'm curious how many people will be utilizing this new turret on their Razorbacks?

Till next time,
–The Harrower

Friday, December 31, 2010

New Stormraven and Furioso Sprue Pics!

This just missed Christmas by a few days, but tis the season to be jolly if you are a Blood Angels player. I found these new leaked pics of the Stormraven and the Furioso Dreadnaught sprue from over on Freak Factory.

I have to say, I'm really starting to like the look of the Stormraven. It's ugly in a bad ass bull dog kinda way. I'm looking forward to when the final kit is released so I can pick up a couple of them.

I can't wait to paint one up in black with a red "X" and unleash the Death Company and a Death Company Dreadnaught against my foes. It's really the only way I would ever field Lemartes as I think Death Company with Jump Packs are just too expensive, but that's a topic for another conversation.

Even though the Stormraven is starting to look really cool, I think the real gem is the new Furioso Dreadnaught sprue (picture below). I picked up the Chaplain Dreadnaught from Forgeworld and while I really like it, I like the options on this sprue so much better.

Looks like the new sprue comes with blood talons, 3 sarcophagi (including a Death Company one), a force halberd, and lots of other tidbits. I really like the sarcophagus with the built in psychic hood and all of the sculpted Blood Angels iconography. I have't started on my Chaplain Dreadnaught yet and these new pics are making me consider putting it up on eBay. I wish the pics were a little clearer as it's hard to tell if this comes with the frag cannon and the magna-grapple.

Hopefully these kits go up on pre-order soon so we can get some better pics.

Till next time,
–The Harrower


Wednesday, November 24, 2010

Blood Angels 2nd Wave Rumors


As I'm sure everyone saw, the new update on Monday's incoming article wasn't very new. Kinda disappointing. I'm not one to GW bash, but that's what one comes to expect from GW's marketing department.

Usually we do get something on special via the newsletter on holidays, so I am hoping this Thanksgiving they decide to give thanks to their fans and bestow some Blood Angels goodness upon us.

So the rumors have the 2nd Wave consisting of the following:
  • Stormraven Gunship (with all of the options from the codex)
  • Furioso Dreadnaught (with all of the options from the codex including Librarian bitz)
  • Blood Angels Battle Force with 10 Tactical Marines, 5 Assault Marines, 5 Death Company, and a Rhino
I'm not crazy about the Battle Force. I was hoping for either 10 Death Company or a Razorback, but it does work for new players. I just won't be buying one as I never buy Rhinos and I have more Tactical Marines than I know what to do with.

I'm in a much less intensive class this month so I'll have time to update my blog more. I'll have some more meaty hobby articles soon.

Till then,
-The Harrower

Sunday, November 21, 2010

Blood Angels 2nd Wave Confirmed for February


From the Games Workshop Newsletter:

The Blood Angels are one of the most popular Space Marine Chapters. They fought at the Emperor's side during the earliest days of the Imperium as one of the original Legions. Ten thousand years later, and one of the longest-running Chapters, they are still shaped by the deeds of their Primarch Sanguinius. Few Space Marine Chapters are as prolific and loyal in their defence of the Imperium as the Blood Angels, though a flaw in their gene seed makes them susceptible to the Black Rage and the Red Thirst - all-consuming curses that turn them savage and blood-thirsty in battle...

In February 2011, the Blood Angels will receive more reinforcements, including never-before-seen models - visit the website tomorrow for more information from the Studio in their Incoming! article. If you want to start massing your own Angelic Host, or are looking to bolster your troops, then here are some essential items to prepare for the new arrivals in February.

We definitely know that the Stormraven is a part of this release and a Furioso Dreadnaught seems to be a safe bet. There has also been talk of a Blood Angels Battle Force. I'm hoping for a new Dante and Mephiston, but I'm not holding my breath. What do you guys want to see?

Till next time,
–The Harrower

Wednesday, November 17, 2010

Is the Stormraven ugly or is it a bad pic?

I've been staring at the pic of the Stormraven for a few days and reading all of the comments that people have been posting. I still can't decide if I like it or not, but a lot of people with the inside line that have seen other pictures of it say that it's awesome.

Here's a 3d render that Falk did over on Warseer which is an awesome idea and something I wanted to do, but I've been too damn busy with school to do it myself.


I have to say, this gives me a lot of hope for the model. I'm still not crazy about the turret, but I could always use that for my Razorbacks. Even if the Stormraven is as bad as the leaked picture shows, it's still not that much of a big deal to me as I'll just convert the bits I don't like.

So what do you guys think? Is the Stormraven still just plain butt ugly or has Falk given us cause to hope? Let me know in the comments below.

Till next time,
–The Harrower

Thursday, November 11, 2010

Stormraven Unveiled!!!

Sorry for the stagnancy with my blog. My Game Art degree at Full Sail University has been keeping me extremely busy and I haven't been able to keep up with the hobby at all.

I did get a chance to attend the last Baltimore Games Day and I took a ton of pictures. My classes start to wind down a bit around the holidays, so I'll try and post more then.

I wanted to share this picture of the Blood Angels Stormraven that was leaked on Games Workshop's website.


The picture was accompanied with the following article:

Over the next few pages, we will be taking a look at how to paint the Blood Angels Stormraven Gunship, including how to weather the vehicle and paint the interior detail. A great addition and centrepiece model for any Blood Angels army, this will be an invaluable guide to help you get the most from this fantastic kit.

Death from Above
The Stormraven Gunship is an incredibly versatile craft, able to fulfill the roll of orbital dropship, armoured transport and strike aircraft in a way that few, or indeed any, ships could hope to match. The Stormraven ensures that the Blood Angels remain undisputed masters of the skies, as dominant in the air as their troops are on the ground. Smaller and nimbler than the more cumbersome Thunderhawk Gunships, the Stormraven's compact hull and vectored thrusters enable it to operate at maximum efficiency in all but the densest terrain. A Stormraven can often be seen hurtling straight into the heart of the enemy forces, unleashing its considerable arsenal in a terrifying display of firepower, before disgorging a squad, Dreadnought, or even both, into the thick of the fighting.

On the tabletop
With its potent firepower, speed and transport capacity, the uses of a Stormraven on the battlefield are myriad, but its role of choice is as an unparalleled assault vehicle. With a huge variety of weapon options, and no less than four tank-busting Bloodstrike Missiles, both enemy infantry and vehicles alike fear drawing the attention of its guns. A transport capacity of 12 combined with the ability to safely carry a Dreadnought to battle as well certainly proves the Stormraven to be a transport vehicle of the very finest quality. This unique combination of speed, firepower and transport capacity means that a Stormraven can support any tactical preference, so there is always a place for it in any Blood Angels army.

Nick: A Stormraven will be the focal point of your army, so it's well worth giving it a lot of attention when painting it. These techniques can effectively be applied to any other vehicles in your Blood Angels army too, so keep this in mind and you will have a great looking fleet of vehicles in no time. I painted this Stormraven to match the battleforce that I painted for the Blood Angels army workshop in February 2011's White Dwarf; it's part of the 3rd Company, in keeping with the rest of the models. As a personal touch, I've weathered the model to appear heavily battle worn, but if you wish to keep your vehicle in pristine condition, skip page 6 and you'll have an immaculate vehicle, fresh as if at the beginning of a campaign.

I have to say, I'm not really blown away by it. It looks a bit too... chunky for my tastes. I'll reserve final judgement until I see it on the table top and I'll definitely be picking up at least one. I just thought it would be a sleeker design.

The other item of note is the Dreadnaught in the background. This looks like a new plastic kit. Both of these kits would make for a sweet Blood Angels second wave. Let's hope they are released soon.

Till next time, Enim Sanguinius!
–The Harrower


Saturday, May 1, 2010

Stormraven Gunship Conversions Part 2


This is Part 2 of showcasing all of the Stormraven Gunship conversions I could find. Don't miss Part 1 here.

It's been about a month since the Blood Angels Codex has been released. We started out with some pretty good Stormraven conversions. It's only a month later, but you'll see that the quality of the models on this post is definitely amped up.

I've been scouring the internet trying to find all of the Stormraven conversions I can, and this is what I came up with. And people it's Stormraven not Storm Raven. Sheesh. Give the boys in red some respect! And it only makes the Google searches that much harder...

There are concepts, resin base models to start from, and full blown conversions below. I hope these inspire you to create your own conversions. If you have seen a Stormraven that I haven't featured here, please add a comment and provide me a link and I'll add it in if I ever do a part 3.


This is a really nice concept. It's been more refined from the version I posted last time and I think it looks a lot better. I hope someone builds this bad boy soon...


These models are available as resin kits from Old Crow Models. Either one of these would be a great base to build a Stormraven from. If you want to order your own, here is a link.


A straight up flying Land Raider. Looks a lot cooler then I imagined.  If you are on a budget, this is a good minimalist approach to take.


A variation of my favorite Stormraven from my last post. I'm sure it isn't done, but it needs guns. : )


This Stormraven was done by m0rm0k and he posted a link to it in the comments of my first Stormraven post. I really like how the dread attaches on the back. If you want your Stormraven featured on here, send me a note in the comments.


Who said Stormravens are just for Blood Angels? This one has a lot of crazy bits and iconography all over it. Those are the biggest Assault Cannons I have ever seen!


Another variant of the flying Land Raider. I just wish it was a little less clunky.


I wish I could see this one painted. I like the larger profile Stormravens better, but this one looks really cool.


This one was done by some dude at the Chicago Battle Bunker. Looks WAY too big for my tastes, but I'd like to see it painted before passing final judgement. I do like how the front looks like a Firefly. Here is a link to a YouTube video of it.


I believe this is from the same dude that did the other Dark Angels Stormraven above. I really like the base and all of the extra bits. Not sure why he paints his flying stands black though. Its very distracting and ruins a good looking model IMO.


Talk about distracting! Nothing cooler than seeing a flying red "X" carrying its payload of impending doom. I've seen a lot of people online say they would never take Death Company and they have been severely nerfed in 5th Edition. Nothing could be further from the truth. If I deployed this, it would send my gaming group into a panic.


I had this one in Part 1 and here it is all painted up. I still think it's too big and I'm not a huge fan of the overall look, but I have a lot of respect for the amazing conversion work and painting. This looks like something that came right out of the GW Studio in Nottingham.


This last Stormraven is my new favorite. It's still a bit big, but damn does it look cool! I wish I had more pics so I can see underneath it and figure out how the Dreadnaught attaches. If anyone has more pics of this one, please send them my way. If GW doesn't release a Stormraven with the Grey Knights, this is what I'll be making for my army.

Hope you enjoyed looking at all of these awesome models. Hats off to all of the dedicated modelers out there who are putting these together. You guys are doing a great job! I've been doing some heavy conversion work on my Blood Angels army. I'll post some pics next time.

Until then Enim Sanguinius,
–The Harrower